

Deploy an Eleventy Blog on Cloudflare pages, part 4
with Strapi, MySQL, and Dokku on a Digital Ocean Droplet


Table of contents
- Sidequest: Installing NVM in Powershell
- Local Strapi backend Installation
- Configuring our Local Strapi Backend
- Install GraphQL plugin and configure it locally
- Creating a Collection Type for Articles
- Set roles and permissions on our Strapi API
- Database configuration with .env variables
- Testing the Strapi API Locally via GraphQL
- Still to Come...
Originally published at: victorfeight.com/2022/06/secure_dokku_dropl..
Welcome back!
╰(°▽°)╯
If you've been following along so far, you should have a Dokku instance on DigitalOcean that's been hardened from attackers (through SSHD configuration and Fail2Ban static IP allow-lists). You should also have a MySQL database server installed onto the instance. ✔
In this post, we'll be installing Strapi CMS onto our local machine, and then allow Strapi to talk to our local MySQL instance. Strapi is an open-source content management system that eases managing a custom blog by enabling multiple users and fine-grained permissions over adding, editing, or deleting posts.
Once it's set up, it's as easy as making a new post with your username through Strapi's dashboard, and the file will get posted into our database automatically. We can turn on the GraphQL Playground and start querying for our posts.
INFO: Hostname is blocked by MySQL Recently, I had an error when trying to connect to my remote mysql instance via MySQL Workbench. The error was along the lines of: Host is blocked because of many connection errors.
At this point, I ssh'd into my machine with ssh vic@apps.vicstech.xyz, entered my dokku db instance with dokku mysql:enter db and while in the dokku db bash instance, entered mysql -u root -p followed by my db password.
Once in, I ran FLUSH HOSTS; to empty the host table. Apparently this happens if more than max_connect_errors occur successively for a given host, MySQL will block them. By flushing the tables, further connection attempts from the host are allowed.
Sidequest: Installing NVM in Powershell
TIP: Strapi and Node versions
- Strapi won't run on NodeJS odd numbered versions - which are for developers. If you're not using LTS, you can temporarily change to use 14.16.1 with
nvm use 14.16.1in an elevated powershell (assuming nvm is installed).
TIP: The easiest way to install nvm (Node Version manager) is to use Chocolatey. 🍫
- Right Click Powershell icon in Start menu, select Run As Administrator.
- Confirm chocolatey is installed by running
chococommand in a new elevated Powershell.

If it's not installed, run the following command:
Set-ExecutionPolicy Bypass -Scope Process -Force; iex ((New-Object System.Net.WebClient).DownloadString('https://chocolatey.org/install.ps1'))Install
nvmusingchocoby running:choco -y nvm- Open a new, regular Powershell and install Node.js using nvm:
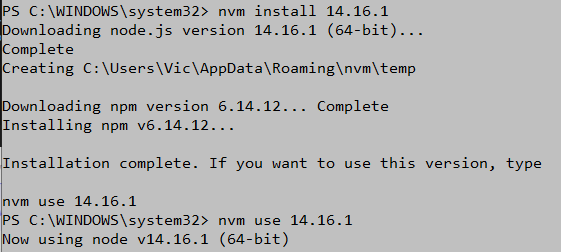
nvm install 14.16.1
Great. We'll need to use Node 14.16.1 LTS in Powershell to ensure optimal Strapi and node compatibility.
Local Strapi backend Installation
Create a new directory in your project and name is strapi-dokku-backend.
We're going to download the latest Strapi code onto our local machine before pushing it to our dokku instance.
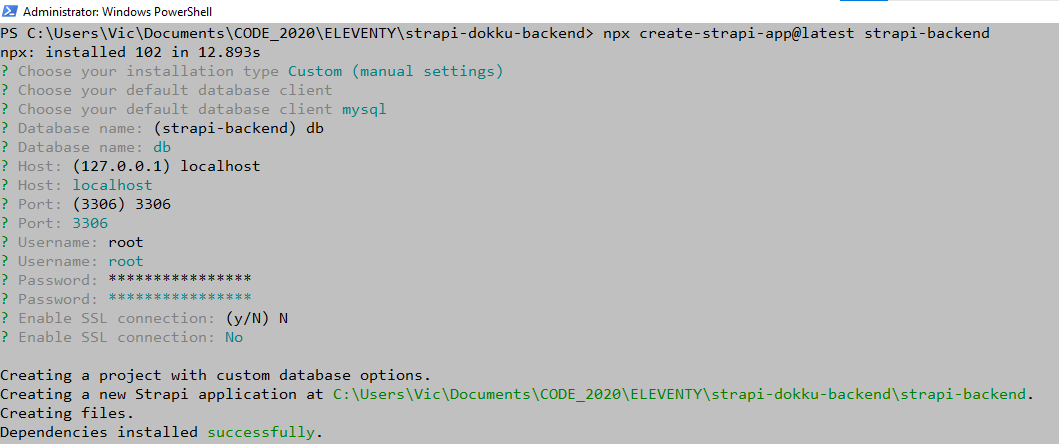
In powershell with node 14.16.1 enabled, run npm/npx to install the Strapi project named 'strapi-backend' locally:
npx create-strapi-app@latest strapi-backend
- Choose manual Installation with arrow keys, press Enter
- Choose mysql as default database client
- Enter
dbas Database name. - Enter
localhostas Host. - Enter
3306as Port. - Enter
rootas username - Enter password used for local and remote root MySQL instances.
- Enter
Nfor "Enable SSL connection" option
INFO: You can retrieve this password by sshing into apps.vicstech.xyz and running: sudo cat /var/lib/dokku/services/mysql/db/ROOTPASSWORD on your Dokku instance.
- If you've been following along, this password should now be associated with both the root user in your local MySQL Workbench, as well as the root user of our remote MySQl instance on the Dokku Digital Ocean droplet. If you entered something different as a local password, ensure DATABASE_PASSWORD in env is set to your remote instance ROOTPASSWORD, as that will take precedence in settings when Strapi is pushed onto dokku.
Next, run the following commands in the newly created strapi-backend directory:
cd strapi-backend
npm install
npm install strapi-admin
Powershell Output:
Strapi command reference:
Available commands in your project:

npm run develop
# Start Strapi in watch mode. (Changes in Strapi project files will trigger a server restart)

npm run start
# Start Strapi without watch mode.

npm run build
# Build Strapi admin panel.

npm run strapi
# Display all available commands.

# You can start by doing:
cd /mnt/c/Users/Vic/Documents/CODE_2020/ELEVENTY/strapi-dokku-backend/backend
npm run develop
Configuring our Local Strapi Backend
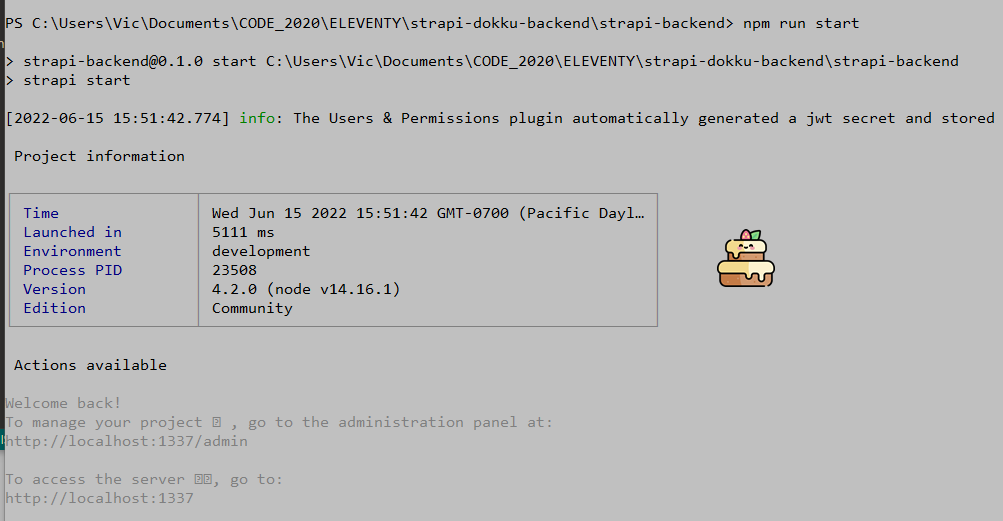
We can go ahead and give it a whirl by running the following commands in the Strapi strapi-backend folder:
npm run build
npm run start
If everything went smoothly, you should get a Windows Firewall notification asking to allow Strapi permission to serve its admin panel. Go ahead and allow it.
As per Strapi developer docs quick start guide:
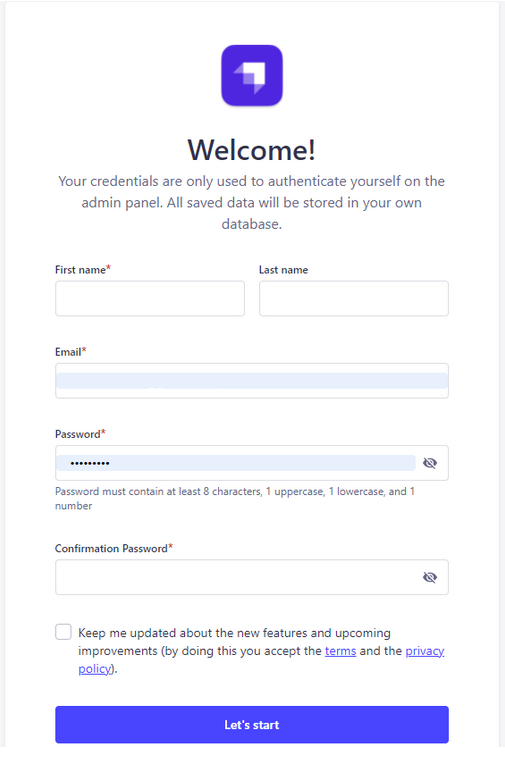
Once the installation is complete, your browser automatically opens a new tab. By completing the form, you create your own account. Once done, you become the first administator user of this Strapi application. Welcome aboard, commander! 🥳
Complete this form to create the first Administrator user and click Let's Start!
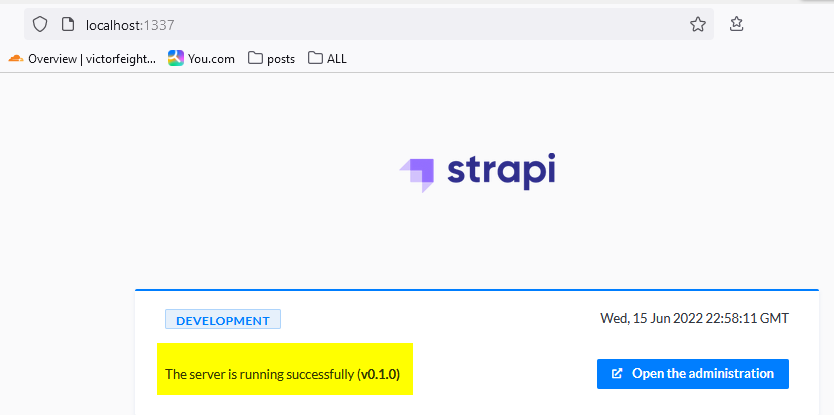
Now you'll have access to the Strapi admin panel. Navigate to http://localhost:1337/admin in your browser and you should see a success message:
Now we've got a local Strapi server running (strapi-backend), configured to use MySQL with a database named db through port 3306.
Install GraphQL plugin and configure it locally
We're going to install the GraphQL playground plugin and configure it to be used both locally or remotely.
Press Ctrl-C to cancel any running Strapi instance, then run the following in your strapi-backend project directory:
npm run strapi install graphql
Output:
Next, create a plugins.js file at /config/plugins.js (in your root strapi-backend directory):
// path: ./config/plugins.js

module.exports = {
  //
  graphql: {
    config: {
      endpoint: "/graphql",
      shadowCRUD: true,
      playgroundAlways: true,
      depthLimit: 7,
      amountLimit: 100,
      apolloServer: {
        introspection: true,
      },
    },
  },
};
This will enable Strapi's GraphQL playground both locally and remotely (by default, it's turned off when deployed remotely), and set its endpoint to /graphql.
Output:

Now, go ahead and rebuild Strapi with GraphQL installed, and run in develop mode:
npm run build
npm run develop
Creating a Collection Type for Articles
INFO: Develop Mode Develop mode allows us to add new collection types, and add fields to these new collection types.
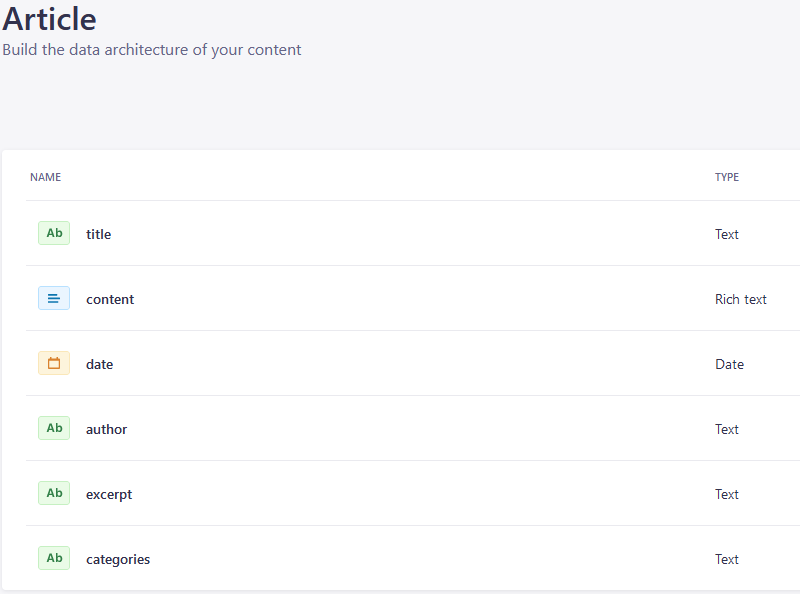
We're going to create a data structure for our future blog content, add some entries and publish them so that the API for the content can be consumed. We do this by first creating collection types for Article with the content-type builder and create the fields to display when adding new entries.
- Navigate to Content-Types Builder under Plugins in the left-hand menu.
- Click the "+ Create new collection type" link
- Name it Article and click continue
- Add a Text field (short text) and name it title
- Click the "+ Add another field" button
- Add a Rich Text field and name it content
- Click the "+ Add another field" button
- Add a Date field (date) and name it date
- Click the "+ Add another field" button
- Add a Text field (short text) and name it author
- Click the "+ Add another field" button
- Add a Text field (short text) and name it excerpt
- Click the "+ Add another field" button
- Add a Text field (short text) and name it categories
- Click the "Finish" button
- Click the Save button and wait for Strapi to restart
For more information, see the Strapi Quick Start guide.
Set roles and permissions on our Strapi API
Next, we'll set roles and permission on our API and and then test querying our new posts in GraphQL.
Click Content Manager on the left menu. Navigate to Article under Collection Types
Click "Create New Entry".
Fill in this information in the fields specified : title: This is my lovely title content: Hope you enjoy this great content. author: vrfeight data pick a date of your choice exerpt: Short description categories: test
Click Save.
In order to send requests to the Strapi API, we need public permissions on our articles to make them accessible.
- Navigate to Settings under General left menu.
- Navigate to Roles under Users & Permissions Plugin.
- Click the Public Role
- Scroll down under Permissions, find Articles
- Tick the find and findone boxes.
- Click Save
Now that we have a collection type with content, and permissions on the articles, we can finally test querying our API. 🎉
Database configuration with .env variables
We'll finish setting everything up locally and confirm that local MySQL database querying works in the GraphQL playground.
Now, the next part's important, so sip your tea and roll up your sleeves. 🍵👕
TIP: Strapi local .env to remote settings
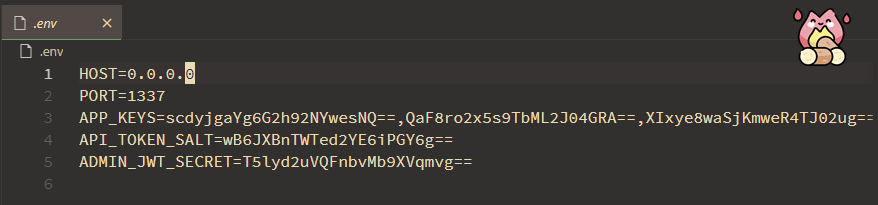
- Strapi uses an environment variable for Host, Port, APP_KEYS, and JWT_SECRET. When pushed to dokku, all these environment variables can be processed once configured on the server for our strapi-backend application, in addition to any other variables set in the
.envfile.
Our authentication strategy is based on the use of Users & Permissions plugin API access.
You will see in the database.js file's module.exports function there is a connection property holding an object with these configuration values (password will be unique, set upon Strapi installation):
require("dotenv").config();

module.exports = ({ env }) => ({
  connection: {
    client: "mysql",
    connection: {
      // host: env('DATABASE_HOST', 'localhost' ),
      host: env("DATABASE_HOST", "localhost"),
      port: env.int("DATABASE_PORT", 3306),
      database: env("DATABASE_NAME", "db"),
      user: env("DATABASE_USERNAME", "root"),
      password: env("DATABASE_PASSWORD", "e754d62fcfk5f929"),
      ssl: env.bool("DATABASE_SSL", false),
    },
  },
});
The way this works, is that the local Strapi server will check the first argument value (ie DATABASE_PORT or DATABASE_HOST), and if these values are not found in the .env file, then use the second argument provided (3306 or localhost)
A default Strapi .env file might look like this:
Thus, we can start by testing our local server with this default .env file, and afterward add database variables in .env with information from our remote mysql server.
This will allow us to query from either a local database (MySQL Workbench) or our remote MySQL instance by commenting or uncommenting Database variables in .env.
TIP: Remote Dokku-mysql environment vars
- Later, when we push Strapi onto our remote dokku instance, we will use
dokku configto set these same environment variables remotely, so that Strapi can pick up our remote dokku-mysql database. 😎
Testing the Strapi API Locally via GraphQL
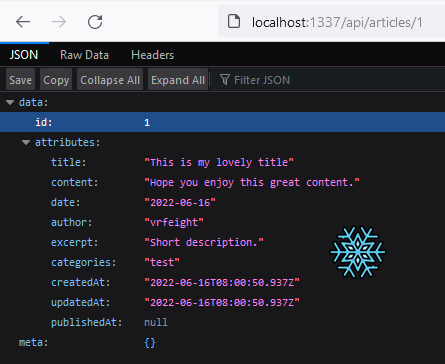
To query your data, navigate to http://localhost:1337/api/articles/1
You should get back a JSON response:
Navigate to localhost:1337/graphql Welcome to your personal GraphQL Playground. 🙂
Try this query:
# Write your query or mutation here
query {
  article(id: "1") {
    data {
      id
      attributes {
        title
        content
        date
        author
        excerpt
      }
    }
  }
}
Output:
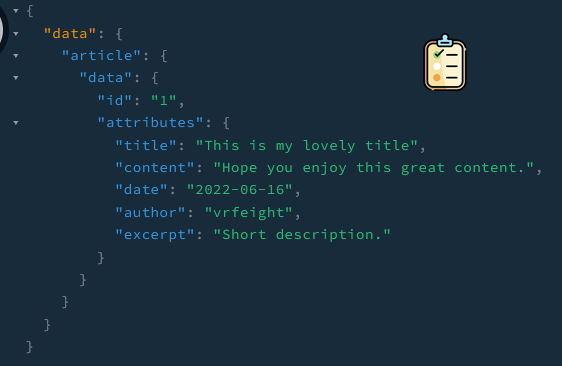
Success. We've just successfully queried our local MySQL database through Strapi's GraphQL playground.
Great job. 🎈
Still to Come...
Next time, we'll be deploying and confiuring Strapi on our Digital Ocean droplet, and we'll use the Dokku Plugin for LetsEncrypt to obtain a free certificate for our domain vicstech.xyz as well as our new strapi-backend subdomain we'll be creating.
Then, we'll practice querying our remote database with GraphQL, and start setting up an 11ty front-end to retrieve entries from the database .
Hope to see you soon.